how-to
Send Form Submissions to Google Sheets
Use Zapier to drop every new submission into a spreadsheet as a row
From an HTML form to a spreadsheet row
An e-mail per submission is fine until you want to count, sort or filter them. A spreadsheet is better at that. With Zapier in between, every submission that reaches your Un-static form endpoint can be appended to a Google Sheet as a new row, without you running any backend code.
The chain is short: your static HTML form posts to your Un-static endpoint, Un-static pushes the submission to Zapier as soon as it has accepted it, and Zapier writes a row in the sheet you pick. Setup takes a few minutes and you only do it once per form.
What you need first
- An Un-static form endpoint that is linked to your account. Webhooks and integrations run off the account, so an endpoint that is not linked to an account will not trigger anything, even though it still e-mails you. Linking is free.
- Any Un-static plan, Free included. Webhooks and integrations are on every account plan, so you do not need to upgrade for this. See the plan comparison if you want the full list per plan.
- A Zapier account. A Zap with one trigger and one action is exactly what Zapier’s free plan allows, and that plan carries 100 tasks per month. Check Zapier’s pricing if your form gets more submissions than that.
- A Google account with the spreadsheet you want to write to.
If you do not have a form on your site yet, start with adding a contact form to a static site and come back here.
Step 1. Create an Un-static API token
Zapier connects to your Un-static account with an API token, not with your password.
- Log in to your Un-static dashboard and open API in the top menu (
/api-tokens). - Click Create Token, give it a name you will recognize later, for example
Zapier. - Copy the token straight away. It is shown once and cannot be read back afterwards. If you lose it, delete the token and create a new one.
Keep the token somewhere safe for a minute, you will paste it into Zapier in step 3.
Step 2. Prepare the Google Sheet
Create the spreadsheet before you build the Zap, because Zapier reads its columns from the sheet.
Put your column headers in the first row and give every column a name, including the first one. Keep row 1 for the headers and nothing else. The first column matters most: Zapier documents the first-column-header rule in Zap is adding rows to the top of the sheet, where an empty header in column A makes the step write rows to the top of the sheet instead of the bottom.
A workable header row for a contact form is:
Submitted at | Name | E-mail | Message | FormLeave the rest of the sheet empty. One header row, no merged cells, no notes above it.
Step 3. Start the Zap with the Un-static trigger
In Zapier, create a new Zap and set the trigger:
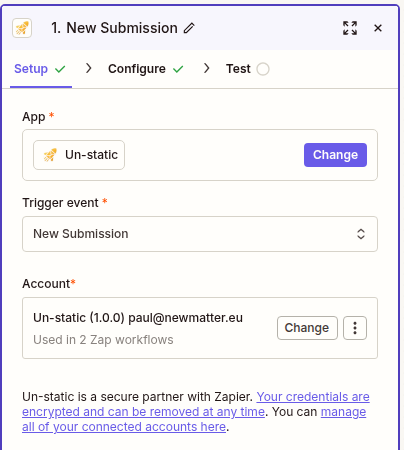
- Trigger app: search for and pick Un-static.
- Trigger event: New Submission. The listing describes it as “Triggers when a new submission is received on your form endpoint.” It is the only trigger the app has, and it fires immediately when a submission comes in, so it is not a polling delay you have to wait out.
- Account: choose to connect a new Un-static account and paste the API token from step 1 into the field Zapier asks for.
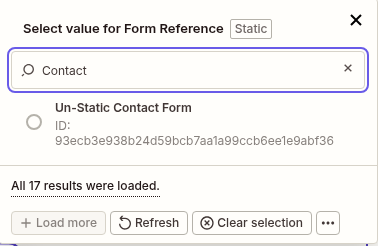
- Trigger configuration: there is an optional Form Reference field. Open it and Zapier lists the forms on your account, each with its title and the form reference underneath, so you can pick the form endpoint you want to watch or search for it by title. The reference is the long string at the end of your endpoint URL,
https://forms.un-static.com/forms/YOUR_ENDPOINT_REFERENCE, and it is also shown on the form’s page in your dashboard.
You can see the connection from the Un-static side afterwards: open the form in your dashboard, go to Integrations and look at the Zapier card, where an active REST hook is listed with its creation date. Deleting the Zap in Zapier removes it again.
Step 4. Send a test submission
Zapier’s test step shows you a sample built from the submissions that already exist on the form. On a brand new endpoint there is nothing to show, so the test comes back empty.
Submit your own form once with recognizable values, then click Test trigger in Zapier. You should get a sample record back that looks like this:
{
  "form_reference": "786035271d01882e129295858656324d3e5110ee",
  "form_title": "Contact form for yourdomain.com",
  "submission_data": {
    "name": "Jane Tester",
    "email": "[email protected]",
    "message": "Testing the spreadsheet"
  },
  "submitted_at": "2026-08-19T10:24:31+00:00"
}
Your own form fields sit inside submission_data, keyed by the name attribute you gave each input. So the field names in your HTML are the names you will see in Zapier. Rename a field in your HTML later and you will have to remap that column.
Step 5. Add the Google Sheets action
For the action step:
- Action app: Google Sheets.
- Action event: Create Spreadsheet Row, described by Zapier as “Create a new row in a specific spreadsheet.” If you would rather have the newest submission on top, Create Spreadsheet Row at Top inserts the row just under the header row instead of appending it at the bottom.
- Account: connect the Google account that owns the sheet and allow Zapier access.
- Pick the Drive, the Spreadsheet and the Worksheet (the tab). Zapier then loads your header row and shows one input per column.
Step 6. Map the fields to the columns
Each column from your header row now appears as a field you can fill from the trigger data. Click a column, then pick the matching value from the Un-static submission in the data picker:
| Column | Value from the trigger |
|---|---|
| Submitted at | submitted_at |
| Name | the name field inside submission_data |
the email field inside submission_data | |
| Message | the message field inside submission_data |
| Form | form_reference, or form_title if you gave the form a name |
You do not have to fill every column, and you can put a fixed value or a bit of text around a field if you want. A column you leave empty simply stays empty in the new row.
Step 7. Test the action and publish
Run the test on the action step. Zapier writes one row into the sheet with the values from your test submission, so open the sheet and check that everything landed in the right column. Delete that row afterwards if you do not want it in your data.
When the row looks right, publish the Zap. From then on every new submission on that endpoint gets appended automatically. Submit the form once more from your site as a final check.
What does and does not reach the sheet
Un-static sends a submission to Zapier only once it has been accepted and the notification e-mail has gone out. That means a few things never show up as a row:
- Spam. Submissions caught by the honeypot field or by the content filter are archived as spam and do not trigger the Zap.
- The honeypot field itself. It is stripped from the data before it is sent, so it never becomes a column.
- Submissions that hit the abuse throttle. Bursts from the same IP or on the same form are archived as failed and never pushed.
- Submissions over your monthly limit. Once your account reaches the hard limit of your plan, submissions stop being delivered and nothing is pushed to Zapier. They are held in your archive up to a ceiling, and past that ceiling they are discarded, so a limit you leave unattended costs you data.
- Submissions whose notification e-mail could not be delivered. The submission is kept, but the Zap only fires after the e-mail goes out, so a bounced or suppressed notification address means no row.
- File attachments. The data sent to Zapier contains the text fields of the submission only. Uploaded files stay with Un-static and reach you as secure download links in the notification e-mail, see receive file uploads on your form.
Without Zapier: send the submission to your own webhook
If you have somewhere to receive an HTTP request, you do not need Zapier at all. In your dashboard, open the form, go to Webhooks and add your URL. Un-static then posts the same JSON to it on every accepted submission, with two differences from the Zapier route:
- The request carries an
X-Signatureheader: a hex-encoded HMAC-SHA256 of the exact request body, signed with the webhook’s signing secret from the dashboard. Recompute it on your side and compare before you trust the payload. - Nothing sits between you and the data, so you write the rows into the Google Sheets API yourself. More work up front, but no monthly task limit afterwards.
The complete static form guide covers where webhooks fit next to the other integration options.
If rows do not appear
- Nothing arrives at all. Check that the form is linked to your account, and that the Zap is published rather than still in the editor.
- Rows land at the top, or in one column. Almost always the header row: give row 1 a header for every column, including the first one.
- New form fields are missing. Zapier maps the columns you set up at the time. Add a field to your HTML form and you have to open the Zap and map it to a column.
- Column values are shifted. Re-open the mapping step and check each column separately, rather than trusting the automatic suggestions.
Let us know if you run into any issues!